

For this first lesson I wanted to give you exercises to help you learn the notes on the guitar neck. For those of you who already have this skill, know that in the next lessons coming up I’ll be showing the ideas behind the chords and song structures in some of the material I’ve written for Deerhoof. However, for those of you who do not have this skill yet, in future posts I’ll be talking about topics where this knowledge will be necessary, and my hope is that you’ll be able to get the most from these lessons possible.
To me, knowing the notes on the guitar neck is extremely important. There are tons of different reasons to learn music theory, but to me the most important skill it adds is the ability to expand on your own natural ideas and to see the patterns that you may be repeating in your writing and improvising. A lot of times when we do what comes naturally we might not be aware that our writing is variations on a theme. It turns out you’re using the same sort of chords, chord movement, song form, rhythmic accents, over and over. If you look at your own music in an analytical way you start to notice, “Oh! I have 3 songs on this album that go from this chord to that chord” or “All of my songs start quiet, have the same verse/chorus pattern and then get big at the end”. Of course, none of that is bad. There are some artists that do a lot with having very minimal variation, but I feel it’s important for that to be a conceptual choice and not an occurrence from a lack of reflection and awareness. It’s also part of what can push you into new areas, when you intentionally make an informed decision to try something that isn’t your first choice.
Your personal physical form will be a part of your connection to the instrument and your sound. If you have larger fingers, have limited dexterity, small hands, you’re missing a finger or a part of finger, if you have a small reach, you can just find what is within your realm of possibility. Try everything. Some things will improve with work and some may not. Don’t be hard on yourself if some aspect of technique does not improve. Keep working on the difficult areas, but focus on what is natural and feels right. Most of us will always have weaker areas, but all of us will have strengths. You want to be honest and have your playing be an extension of yourself. Practicing and writing music is how you’ll discover who you really are.
I took a lot of different paths trying to find myself. I made a lot of choices because I thought it was what I was supposed to do. I loved music theory and the beauty in the inherent connections and relationships in sound. I thought I should be a jazz musician because that had a lot of practicing and theory in it, but as I worked towards that decision I realized I started playing guitar because of Jimi Hendrix. I was a rock guitarist, that’s what I loved and who I was. So I began to just use the things I found interesting, dense chords and harmony, dissonance, abstract forms and approaches, and I deliver them in a way that I eventually felt was honest, trying to be completely who I realized I was. I didn’t feel bad because I was a truly mediocre jazz musician. I was just happy that I figured out myself a little more. I think that’s really important, to not cut yourself down, to always want to improve but to recognize that in your path, at every stage, there is potential for you to create something uniquely personal. Keep working for tomorrow but live for today. Don’t think you’re not at the stage to write a song/record/start a band. Just try!
THE LESSON:
Here is a sheet with all of the note names on it. You may notice some notes have two names. These are called enharmonics. You would choose the note name depending on the context. A note with a # is a sharp note. A note with a b is a flat note. For instance, F# = Gb. F sharp is the same note as G flat.
The names of the notes move from C to C.
C - D - E - F - G - A - B - C
The only notes that are right next to each other are B to C, and E to F. If you read through the chart, I believe you will see that pattern.
On the chart the strings move from thickest to thinnest E, A, D, G, B, E. If someone refers to the 1st string, they are speaking of the thinnest string with the thickest being the 6th string:
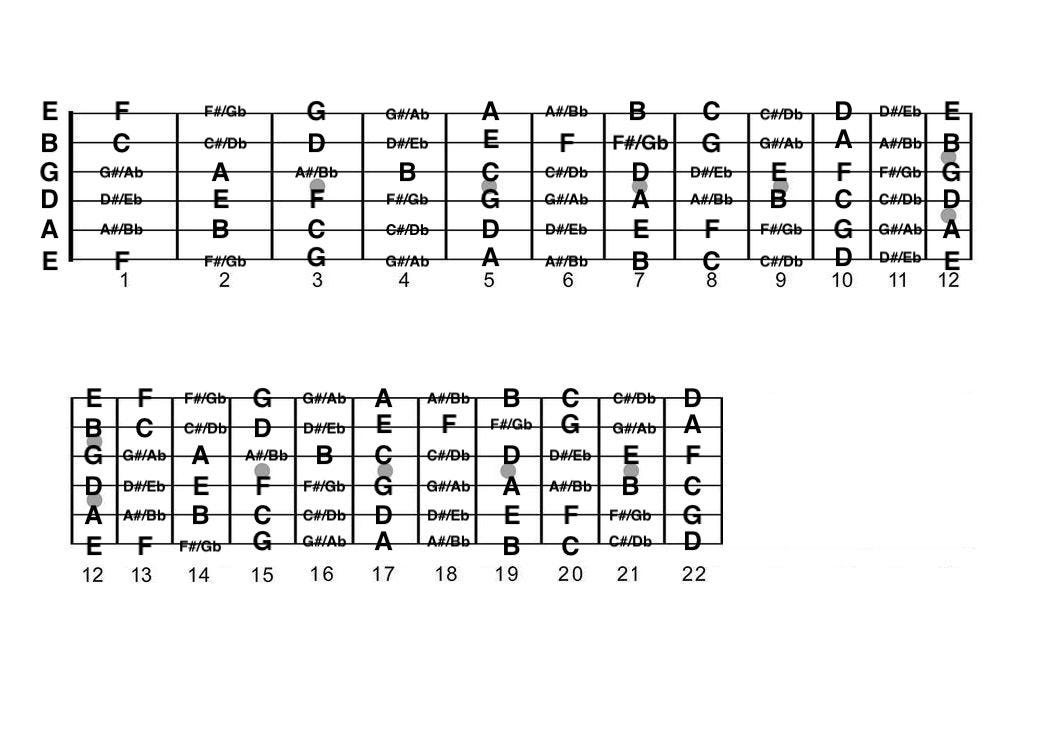
When you work on the exercises, with the notes that have an enharmonic, spend a cycle going through all of the notes thinking of them as flats and then spend another cycle thinking of them as sharps. For example, you look for F sharp. Then later, you look for G flat.
The notes on a guitar neck repeat once you hit the 12th fret. The notes at the 12th fret are the same notes as that same open string up one octave. The 13th fret on a string is the same note as on the 1st fret, except an octave up. And so on.
Exercises:
Choose one note and find where you can play it on each string.
Vary the way you play it.
And when you do any of this, PLAY. Use emotion, be creative. Feel like this is a musical piece, a performance, have fun, enjoy the magic of creating and the fun of guitar!
Some variations (See video):
- Slides to the note from below
- Slides to the note from above
- Bending from below to the note
- Bending from below to the note, then slide to the note
- Different types of vibrato
- Vary the speed between note (fast between two notes, fast between three)
- Tremolo picked
- Passing the same note from finger to finger while holding the note
- Passing the same note from finger to finger while picking more than once
- With drones, this can also help to hear interval relationships. More on intervals later. Playing with a drone can also be more fun! You can use a loop pedal to set a note, or do a YouTube search for “Drone note” and let that play. If you have a keyboard (a synth, organ or anything that can sustain a note) you can tape down a key, or set something heavy on a key to hold it down.
- Use your effect pedals if you have any. Start with just one and change around the knobs as you improvise. Just use one pedal at a time in order to learn all the things that pedal can do in relation to your playing.
- If you have a tremolo bar, do these exercises incorporating that. Adding vibrato of different speeds, bending the bar down and raising into the note, bending the bar up and lower to the note, slapping the bar.
- Go from a fretted note to tapping the next note with your right hand.
- Go from a fretted note to tapping the next note with your pick (if you use one).
- Harmonics (covered more later)
- Pinch harmonics (covered more later)
Start slow and don’t overwhelm yourself. Pick a string and go up, fret by fret and say the note names to yourself.
Go to the string next to that string and do the same. Now choose one note. Find that note on both strings. You may need to look at the sheet for a while but that’s ok. Once you can find all the notes comfortably on those two strings, add the next string to that and repeat the process until you are going across all 6 strings finding each note you choose.
You can practice the mechanics of this at anytime—while you’re on a walk, in the car, lying in bed—anywhere. Visualize the neck and see where those notes are.
This may take a little time, but you’ll get it!
Enjoy!
Share this post